A bathroom layout is decided in inches. The difference between a room that works and one that is irritating every morning is rarely the tile or the tap. It is the vanity drawer that hits the toilet, the door that swings into the person drying off, the shower that is technically large enough and still too tight to turn around in, or the outlet that ended up on the wrong side of the sink because the shower was too close.
Those problems are all fixed on paper, before anything is ordered and before anyone opens a wall. Once the drain is set in the floor and the valve is roughed into the wall, the layout is effectively permanent.
This guide covers the spatial side of a bathroom renovation: the dimensions that matter and why, the common layouts and the rooms they suit, what each fixture needs around it, what can realistically move in a Toronto house or condo, and how to test a plan before demolition. What a bathroom contractor does, why waterproofing decides the result and what to ask before you hire are covered separately in what to ask a bathroom renovation contractor first.
A note on the numbers in this guide
Most of the planning dimensions below come from the Bathroom Planning Guidelines published by the National Kitchen & Bath Association (NKBA), the industry reference most North American bathroom designers work from. They are recommendations for a comfortable, usable room. They are not Ontario Building Code requirements, and the code minimums the NKBA document cites are drawn from US model codes rather than Ontario’s.
Where an Ontario rule genuinely applies, such as scald protection at the shower valve, safety glass in a shower enclosure, bathroom exhaust or where an outlet can go, it is named as an Ontario rule. Codes are revised, so the licensed plumber, the licensed electrician and the building inspector apply whatever version is in force when the work is done. Treat every figure here as a planning starting point, and treat the fixture manufacturer’s installation instructions as the final word on that fixture.
Start with the room you actually have
Every good bathroom layout starts with an accurate survey of the existing room, and the survey matters more than it looks. Older houses in Toronto are rarely square, rarely level and rarely the size the listing said.
Measure more than the floor
Measure each wall at floor level and again at about waist height, because walls in older houses lean and bow. Check the diagonals to see whether the room is square. Note the ceiling height and any slope, which is common in second- and third-floor bathrooms tucked under a roofline. Record the window position, its width and its sill height, and the door width, the direction it swings and what is on the other side of it.
Then record what you cannot see but can infer: where the toilet drain comes up, which wall the main stack runs in, where the heat comes from, and whether there is a radiator, a floor register or baseboard heat taking up wall space.
Find the stack before you design anything
The main stack is the vertical drain-and-vent pipe the whole bathroom ultimately connects to. In most houses there is one, and the toilet, which has the largest drain in the room and the least flexibility, wants to be close to it. The shower and vanity can usually be further away, because their drains are smaller and easier to run.
Knowing where the stack is tells you, before you fall in love with a floor plan, which arrangements are straightforward and which mean opening floors and ceilings in other rooms.
Know which way the floor joists run
In a wood-framed house, the floor joists decide how easily a drain can move. A drain that has to run along the joists travels inside the floor cavity. A drain that has to cross them either needs a ceiling bulkhead below or needs the joists modified, and cutting or notching joists is structural work that has to be designed and approved, not improvised on site.
Joist direction also decides whether a curbless shower is practical, which is covered further down.
Account for the thickness of the finishes
A layout drawn to the framing is not the layout you end up with. Cement board or foam board, a waterproofing membrane, thin-set and tile can take the better part of an inch off each tiled wall, and a shower wall built out to carry a valve or a niche can take more. In a narrow room those inches decide whether a vanity fits. Draw the plan to finished surfaces, not to studs.
The dimensions that decide a bathroom layout
The table below collects the NKBA’s recommended planning figures for the measurements that most often make or break a bathroom. Imperial and metric are both given because fixtures are sold in both.
| Measurement | NKBA recommended planning figure | Why it matters |
|---|---|---|
| Clear floor space in front of any fixture | 30 in (762 mm) to the opposite fixture, wall or obstacle | Room to stand, bend, and dry off without touching the wall |
| Toilet centreline to side wall or next fixture | 18 in (457 mm) | Shoulder and elbow room when seated |
| Single sink centreline to side wall or tall obstacle | 20 in (508 mm) | Elbow room at the basin |
| Two sinks, centre to centre | 36 in (914 mm) | Two people can use the vanity at once |
| Vanity (basin) height | 32 to 43 in (813 to 1,092 mm), to suit the user | Taller users are more comfortable above the old 30-inch standard |
| Shower interior | At least 36 × 36 in (914 × 914 mm) | Space to turn and to lift an elbow to wash hair |
| Shower controls | 38 to 48 in (965 to 1,219 mm) above the floor, reachable from outside the spray | Turning the water on without stepping into it cold |
| Shower seat | 17 to 19 in (432 to 483 mm) high and about 15 in (381 mm) deep | A usable seat rather than a ledge |
| Separate toilet compartment | 36 × 66 in (914 × 1,676 mm), with a swing-out or pocket door | A compartment you can close without sitting against the door |
| Doorway clear opening | 32 in (813 mm) | Carrying laundry, a child or a toolbox through it |
| Toilet paper holder | 8 to 12 in (203 to 305 mm) in front of the bowl, centred about 26 in (660 mm) high | Reachable without twisting |
| Grab bar reinforcement | Walls blocked for bars at 33 to 36 in (838 to 914 mm) high | Bars can be added later without opening tile |
Two points on reading the table. First, these are comfortable figures, not the smallest figures that pass. The NKBA document cites tighter code minimums, including 15 inches from a toilet’s centreline and a 30-by-30-inch shower, but those come from a US model code, and a room built to the minimum everywhere feels like one. Second, a plan rarely hits every recommended figure at once in a small Toronto bathroom. The job of the layout is deciding which ones to protect.
Clear floor space is the one to protect first
If only one dimension is defended, make it the space in front of the fixtures. A toilet squeezed a couple of inches closer to the wall is noticeable. A vanity drawer that cannot open fully because the toilet is in the way, or a shower door that clears the vanity by a finger’s width, is something you meet every day.
The simplest check is arithmetic. In a room with fixtures on opposite walls, add the depth of the vanity, the recommended 30 inches of clear space and the projection of whatever faces it. Vanities are commonly about 21 inches deep, with shallower models around 18 inches made for narrow rooms. Floor-mounted toilets typically project somewhere in the region of 27 to 31 inches from the wall, depending on the model, and the spec sheet gives the exact figure. If the total is wider than the room, fixtures cannot face each other comfortably, and the layout has to change rather than the clearance.
Width drives the vanity decision
Two sinks need more wall than most people expect. Using the NKBA figures, 20 inches from each outer sink to the side wall plus 36 inches between the sinks comes to 76 inches of vanity wall for a comfortable double. Double vanities are sold smaller than that, and a 60-inch double works as long as two people are not using it at the same time. If the wall is shorter, one large basin with generous counter space on either side usually serves a couple better than two basins with no counter between them.
Common bathroom layouts and the rooms they suit
Most bathrooms fall into a handful of arrangements. The right one is decided by the room’s shape, where the stack is and which wall can carry the plumbing, rather than by preference alone.
Single wet wall
Every fixture drains into one wall, often the wall the stack runs in. The familiar North American three-piece bathroom, roughly five by eight feet (about 1.5 by 2.4 metres) with a tub across the short end and the toilet and vanity along one long wall, is the classic example.
It is the most economical arrangement to plumb and the easiest to renovate in place, which is why so many Toronto houses have one. Its limits are that the room is a corridor and the clear space in front of the fixtures is fixed by the room’s width. In a five-foot-wide room the tub alcove takes that width exactly, so a tub-to-shower conversion is the usual way to change how it feels.
Fixtures on two walls
The vanity faces the toilet, or the vanity sits on one wall and the shower on another. This spreads the fixtures out and can make a squarer room far more comfortable, but it needs plumbing in two walls and it needs the width worked out using the arithmetic above. It is common in ensuites and in bathrooms created by rearranging older second floors.
The larger ensuite
With more room, the layout can separate functions: a double vanity on its own wall, a shower large enough to walk into without a door, a freestanding tub, and sometimes a separate toilet compartment. The planning challenge shifts from fitting things in to making the room feel organised, so that the toilet is not the first thing seen from the bedroom door and water from the shower does not reach the vanity.
A wet room zone, where the shower and a freestanding tub sit together behind one glass screen on a single waterproofed floor, is one way to do this. It concentrates all the wet surfaces in one area, and it needs the whole zone waterproofed and sloped as one shower.
Separate toilet compartment
A water closet with its own door suits shared ensuites. The NKBA recommends at least 36 by 66 inches with a door that swings out or slides. The two common failures are a compartment so tight that the door has to be squeezed past, and a compartment with no ventilation or light of its own. Both are planning omissions rather than space problems.
Powder room
A two-piece room with a toilet and a small basin, usually on the main floor for guests. Powder rooms are often squeezed into awkward spaces in older houses, including under stairs, so headroom and the door swing are the constraints to check first. A wall-hung or corner basin, a pocket door and a toilet with a shorter projection can make a very small footprint usable. Because a powder room rarely has a shower, it is also the one room where a showpiece finish is not fighting humidity.
Tub, shower or both
This is the decision that changes the layout most, and in Toronto it most often takes the form of a tub-to-shower conversion in a standard alcove.
Converting a tub to a shower
A standard alcove tub is about 60 inches long, so the conversion creates a shower roughly five feet wide and as deep as the old tub or a little deeper. That is comfortably more than the NKBA’s recommended 36 by 36 inches, which is why the conversion is so popular.
Layout-wise, three things change. The drain moves, because a tub drains at one end and a shower usually drains in the centre or along a linear drain at one edge, which means opening the floor. The valve usually moves to a more convenient height and position, reachable from outside the spray. And the entry changes from stepping over a tub wall to a curb, a low threshold or none at all.
Whether to keep a tub somewhere in the house is a household decision. Families with young children often want one, and some buyers look for one. If a house has only one bathroom, removing its only tub is worth thinking about carefully; if there is a second bathroom with a tub, converting the main one is more straightforward.
Shower size and entry
Bigger is better up to the point where the shower starts to steal clearance from the rest of the room. The NKBA recommends at least 36 by 36 inches inside. A walk-in shower with a single fixed glass panel and no door needs more depth, so that water does not travel out of the open side, and it benefits from the shower head being positioned to spray away from the opening.
Where a hinged shower door is used, plan it to swing outward into the room, and check that it clears the toilet, the vanity and the towel rail when open. A sliding or fixed-panel arrangement avoids the swing entirely in a tight room.
Curbless showers
A curbless or level-entry shower looks clean and is easier to use at any age, but it is a floor decision, not a tile decision. The shower floor has to slope to its drain, and without a curb, the sloped area has to start lower than the rest of the bathroom floor. That means either recessing the shower floor into the structure or building up the rest of the room so the two meet.
In a wood-framed house, recessing depends on joist size and direction, and anything that reduces a joist’s depth has to be designed, not improvised. Linear drains help, because the floor can slope in one direction rather than four. In a concrete condo slab, recessing is rarely possible, which is one reason level-entry showers in condos are often achieved with a very low curb instead. Our condo renovation work runs through the building’s rules before a layout like this is promised.
Glass
Ontario’s Building Code requires safety glass, tempered or laminated, in shower and bathtub enclosures. In practical terms the layout question is what the glass is doing: a door that swings, a slider that needs overlap, a fixed panel that leaves an opening, or a screen on a tub. Each needs a different amount of floor and wall around it, and fixed panels need solid framing behind the tile where they are anchored.
Niches, benches and valve walls
A shower niche wants to sit in an interior wall. On an exterior wall it interrupts the insulation and air barrier, and in a wall carrying the stack there may be no room for it at all. Positioning it is a layout decision, because it has to align with the tile layout and with where you actually stand; a niche behind the water stream collects spray, while one on the side wall stays usable.
A bench, built-in or fold-down, has to fit without eating into the space you stand in, which is easier in a converted tub alcove than in a small corner shower.
Ontario’s plumbing requirements limit water from a shower valve to a maximum of 49°C, typically achieved with a pressure-balancing or thermostatic valve. Where the valve body goes is decided with the layout, and it should be reachable before stepping in.
Freestanding tubs
A freestanding tub needs space on all sides to clean around it and to look intentional rather than parked. It also needs a floor that can carry it full of water with a person in it, which is a structural check on older joists, and a floor-mounted filler needs supply lines brought up through the floor, which depends on joist direction and what is below. None of this rules one out; it simply belongs in the layout conversation rather than in the showroom.
The toilet: the least flexible fixture
The toilet decides more of the layout than any other fixture, because its drain is the largest and hardest to move.
Rough-in
The rough-in is the distance from the finished wall behind the toilet to the centre of the drain. Twelve inches is the most common, but ten-inch and fourteen-inch rough-ins exist, and older houses sometimes have one of the less common sizes. Measure it before choosing a toilet. A toilet with the wrong rough-in either leaves a gap behind the tank or does not fit at all.
Moving the toilet
Moving a toilet a few inches along the direction of the joists is often manageable. Moving it across the room, across the joists or further from the stack is a bigger job involving the drain, the venting and possibly the ceiling below. It is worth asking whether a small gain in layout justifies it. Often the better plan keeps the toilet where it is and rearranges everything else around it.
In most condos the toilet drain is set in the concrete slab and is effectively fixed.
Wall-hung toilets
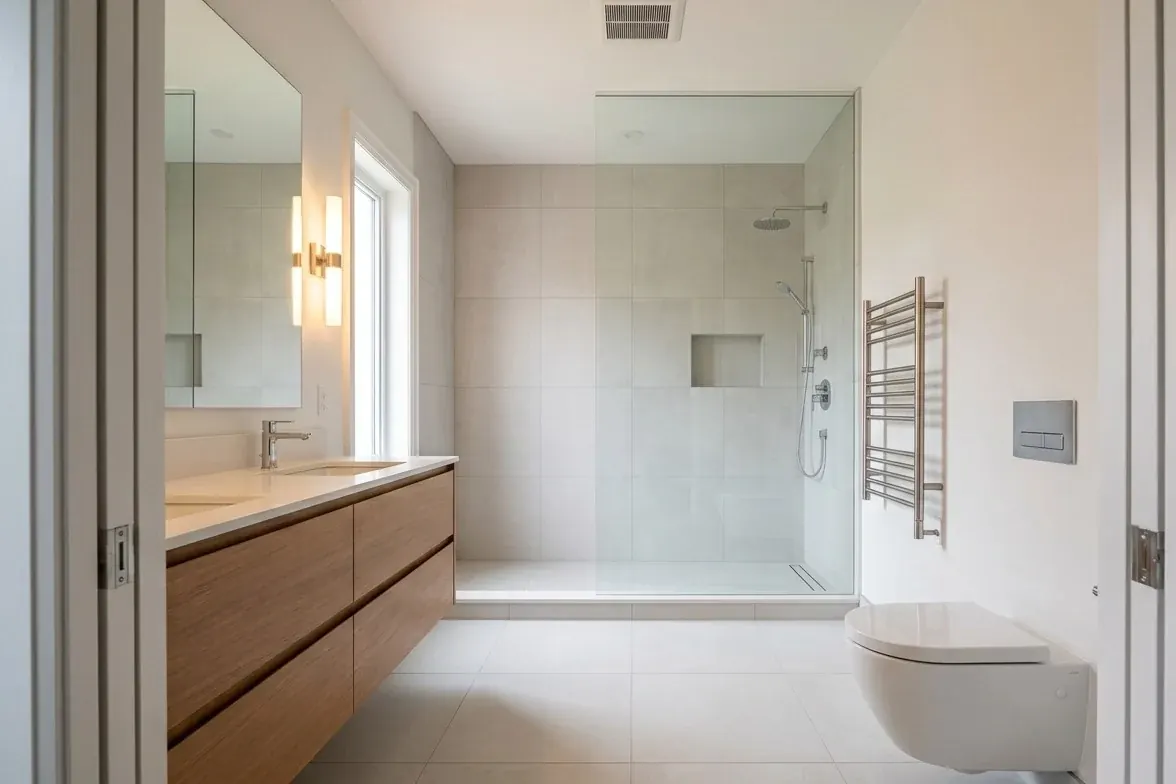
A wall-hung toilet sits on a concealed carrier inside the wall. It frees up floor space visually, makes cleaning easier and lets the seat height be chosen at installation. The trade-offs are a thicker wall to house the carrier, set to the carrier manufacturer’s requirements, and an access panel for the flush mechanism, which should be placed where it looks deliberate.
Around the toilet
Plan the toilet paper holder in the side wall or vanity side rather than behind the user. Plan a receptacle near the toilet now if a bidet seat is being considered, because adding power after tile is difficult. And plan blocking in the walls beside and behind it for a grab bar, even if none is being installed now.
Vanity, storage and the mirror wall
Size and depth
Vanity width follows the wall and the sink decision described above. Depth follows the clearance: a standard vanity of about 21 inches deep in a room that can afford it, a shallower one of about 18 inches where the clear floor space is at stake. A wall-hung vanity, which leaves the floor visible beneath it, makes a small room feel larger and lets a heated floor run under it, but it needs solid blocking in the wall.
Height
The NKBA gives a range of 32 to 43 inches for the basin, fitted to the people who use it. Many people now choose a vanity taller than the older 30-inch standard. In a shared ensuite, two different heights are an option.
Plumbing and drawers
Drawers are more useful than doors in most vanities, but the drain and supply lines have to pass through them. Choose the vanity before rough-in and set the drain height and supply positions to suit its drawer boxes, or specify drawers shaped to clear the trap. This is one of the most common details missed when a vanity is chosen after the walls are closed.
A custom vanity is millwork, and it is planned the same way as other built-in cabinetry: to the room, the plumbing and what needs to be stored. The guide to custom cabinets and built-in storage covers materials and construction, and our custom millwork work covers vanities, linen towers and recessed cabinetry.
Recessed storage
A recessed medicine cabinet or niche needs an empty stud bay of the right size. Exterior walls are a poor choice because the recess interrupts the insulation and air barrier. The wall carrying the stack is often full. Walls with ductwork, wiring runs or a pocket door are also out. Identify which wall can take it before the tile layout is drawn.
Linen and daily storage
Store things where they are used: towels near the shower, toiletries at the vanity, cleaning supplies somewhere out of sight. A tall linen cabinet at the end of a vanity, or a shallow recessed shelf in an unused stud bay, often does more than a larger vanity.
Doors, windows and moving through the room
The door
A door that swings into a small bathroom competes with every fixture. The options are to reverse it to swing out into the hall where that is safe, to use a pocket door, or to accept the swing and plan around it. A pocket door needs a length of wall with no plumbing, wiring, switches or blocking in it, which has to be protected in the layout. A barn door leaves gaps at the edges, which matters for privacy and sound.
The NKBA recommends a 32-inch clear opening. Many older Toronto bathrooms have narrower doors. Widening one is possible, but the wall may be structural, and the hallway may set its own limit.
The window
Older Toronto houses often have a window inside the tub or shower, and it is one of the most common layout problems. Water sits on the sill and runs into the frame and wall. If the window has to stay in the wet area, it needs a frame that tolerates water, a sill sloped to drain, waterproofing that wraps the opening properly and privacy glazing. The alternative, where the room allows, is to rearrange the layout so the window sits outside the shower.
A window also shapes the rest of the room: a mirror cannot go over it, a vanity below it needs the sill high enough for a faucet, and daylight across a vanity is flattering while daylight behind the user is not.
Electrical, lighting and ventilation are layout decisions
The positions of outlets, switches, lights and the exhaust fan are fixed during rough-in, at the same time as the plumbing. They are layout decisions, not finishing touches.
Outlets
In Ontario, the Electrical Safety Code requires a receptacle within one metre of the wash basin and ground fault (GFCI) protection for receptacles near the basin, tub or shower, and the Electrical Safety Authority’s current guidance on Rule 26-720 g) says a bathroom receptacle is to be at least one metre from the bathtub or shower stall, measured horizontally. In a small bathroom that distance can decide which side of the vanity the outlet ends up on, and sometimes whether it goes inside a vanity drawer instead. Confirm the current rule with the licensed electrician, who is responsible for the installation and its notification to the ESA. How that licensing and notification works is explained in how to choose an electrician for your renovation in Ontario.
Plan outlets for what will actually be used: a hair dryer, an electric toothbrush, a shaver, a bidet seat, a lit or heated mirror, and heated floor and towel warmer controls.
Lighting
A bathroom needs more than a single ceiling fixture. General lighting lights the room. Task lighting at the mirror lights the face, and the NKBA recommends placing it beside the mirror at eye level, so faces are lit from the front rather than from above. Where a light goes in the shower, it has to be rated for that location. A low night light is useful at 3 a.m. Switches belong at the door, and nothing should be within reach from inside the tub or shower.
Heated floors and towel warmers
Electric floor heating is laid only where the floor is open, so the layout decides where it runs. It usually goes in front of the vanity, in the shower (if specified for it) and along the paths you walk, and not under fixed cabinets or the toilet. The thermostat wants a sensible spot near the door. A towel warmer belongs within reach of the shower exit.
Ventilation
The Ontario Building Code’s ventilation requirements for houses call for an exhaust fan in each bathroom, switched in the room and vented to the outside. Position the fan so it draws moisture from the shower rather than from the doorway, and plan the duct route with the layout. A duct that has to travel a long way, turn several times or cross joists works less well and has to be accounted for early. In a condo, bathroom exhaust connects to the building’s system, and the location of the connection is usually fixed.
Planning a bathroom in a Toronto house, condo or basement
Older houses
Many of Toronto’s semis, row houses and older detached houses have one small bathroom on the second floor, often a five-by-eight three-piece, sometimes with a window in the tub. Opening the walls in these houses commonly finds plaster and lath, older drain and supply piping, uneven floors, and earlier renovations done without much care. The layout plan should allow for what the demolition might reveal. A floor that is out of level needs levelling before large-format tile, and a sagging floor under an old tub needs to be understood before a heavier stone or tiled shower goes on it.
Radiators, still common in older Toronto houses, take a section of wall that cannot hold a vanity or a towel rail. They can be moved, but a hydronic heating change is part of the layout decision, not a detail for later.
Condos
Condo bathrooms are designed around fixed drains in the slab, shared stacks and a building exhaust system, and changes usually need management or board approval before work starts. The practical result is that condo bathrooms are typically renovated largely in their existing layout, with the finishes, the vanity, the shower enclosure and the storage doing most of the work. Noise transmission, water protection for the unit below and working hours are handled within the building’s rules. Our condo renovation service covers those constraints.
Basements
A basement bathroom has its own layout constraints. If the fixtures sit below the level of the main building drain, gravity cannot carry waste away, and a pump is needed to lift it. Ceiling height, the location of the main drain and where the plumbing can run through the slab set what is practical. Adding a bathroom where there was none is also the kind of work that normally needs a permit. The questions to settle before finishing any basement are covered in our guide to basement renovations in Toronto, and our basement renovation page covers how that work is run.
Permits
Replacing fixtures in the same place typically does not require a building permit. Moving drains, changing the structure or adding a bathroom where there was none usually does. In Toronto the City’s building division makes the final call, and each municipality in the GTA runs its own building department, so confirm it for your address before the layout is fixed. Electrical work is covered separately through the Electrical Safety Authority.
What can move, and what moving it involves
It helps to see layout changes as a scale, from swapping fixtures in place to adding plumbing where none existed. The further down the table a change sits, the more of the house it touches, the more trades it involves and the more likely it is to need a permit.
| Change | What it involves | What to expect |
|---|---|---|
| Replace fixtures in their existing positions | New fixtures on the existing drains and supplies | The simplest scope; typically no building permit |
| Move a vanity along the same wall | Extending the supply lines and the drain arm inside the wall | Usually modest; the wall is opened anyway |
| Convert a tub to a shower | New shower drain in a new position, new valve, new waterproofing and entry | The floor is opened; moving the drain usually needs a permit |
| Move a toilet | New drain position and venting, depending on joist direction and distance to the stack | Can involve the ceiling below; usually needs a permit |
| Create a curbless shower | Recessing the shower floor or building up the room, with a drain to suit | A structural question in wood-framed floors; rarely possible in condo slabs |
| Add a bathroom where there was none | New drains, vents and supply, sometimes a pump in a basement | A full plumbing project; normally needs a permit |
The layout that looks best on paper is not always worth what it takes to build. The best plans often keep the toilet and the stack where they are and gain the most by rearranging the shower, the vanity and the storage.
How to test a bathroom layout before demolition
A plan that looks right can still be wrong in use. These checks catch most problems while they cost nothing to fix.
Draw it to scale, in plan and elevation
A floor plan shows whether things fit. Elevations of each wall show whether they work: the mirror height against the light, the outlet against the backsplash, the niche against the tile layout, the shower valve and head against the height of the people using them, and the towel bars against the door swing. Draw to finished surfaces, with the actual fixture dimensions from the spec sheets.
Tape it on the floor
Mark the fixtures on the floor of the existing room, or a room the same size, with painter’s tape. Then use it. Open the door. Stand where you will dry off after a shower. Sit where the toilet will be with the door closed. Pull an imaginary vanity drawer all the way out. Stand two people at a double vanity. A drawing tells you a room fits; ten minutes standing inside the tape tells you whether it is comfortable.
Choose the fixtures before rough-in
The plumbing rough-in has to be set to the fixtures actually being installed: the toilet’s rough-in, the vanity’s drain height and drawer layout, the shower valve body, the tub drain position, and the mounting of a wall-hung toilet or vanity. Choosing after rough-in means the fixture has to fit whatever was guessed. The same timing applies across a renovation, and what to choose before a renovation starts maps each selection to the point in the job when it has to be made.
Mark the blocking
Blocking is solid wood between studs where something will be mounted. Grab bars, a wall-hung vanity, a glass panel, heavy mirrors, towel warmers, a TV or a shelf all need it. Photograph every wall before the board goes on, with a tape measure in frame, so its position is known for good.
Planning for later: safety and ageing in place
A bathroom renovation is the cheapest moment to make the room easier to use later, even if nobody needs it now. None of the following has to look clinical.
- Blocking in the shower and beside the toilet, so grab bars can be added later without opening tile. The NKBA recommends walls able to support a 250-pound (113 kg) load at 33 to 36 inches high.
- A low curb or level entry to the shower.
- A handheld shower on a slide bar, alongside or instead of a fixed head.
- A shower seat at 17 to 19 inches high, built in or fold-down.
- Lever handles on taps and the door.
- A wider doorway where the wall allows it.
- Slip-resistant tile on the floor and in the shower.
These choices make a bathroom more usable at any age. They are not the same as designing to a formal accessibility standard, which has its own detailed requirements and is a separate brief.
Common bathroom layout mistakes
- Drawing the layout to the studs rather than to the finished tile surfaces.
- Choosing the vanity after rough-in and discovering the drain passes through the top drawer.
- Moving the toilet for a small improvement that a different vanity would have delivered.
- A shower door that swings into the toilet or the vanity.
- A niche positioned in the spray, or planned for a wall that turned out to hold the stack.
- An outlet that ends up on the wrong side of the vanity because of its distance from the shower.
- Leaving the window inside the shower without detailing it for water.
- An exhaust fan placed by the door instead of near the shower.
- Heated floor laid under the vanity and not in front of it.
- No blocking for grab bars, glass, a wall-hung vanity or towel warmers.
- A pocket door planned for a wall that carries plumbing.
How ZaRRuS plans a bathroom layout
On a ZaRRuS project, the layout is settled before anything is ordered. We survey the room, confirm where the stack is and which way the floor structure runs, and draw the plan and wall elevations to finished dimensions with the actual fixtures in them. The client walks the plan before demolition, and the rough-in positions are set to the selected fixtures rather than to assumptions.
Projects are owner-managed from survey to handover, and specialized scopes go to experienced trade specialists. Licensed trades are used where regulated work requires them, including plumbing and electrical, and permits are applied for where the work calls for them. The same attention goes into the parts of the room nobody sees again: the blocking, the waterproofing and the drain positions.
Frequently asked questions
What is the smallest practical size for a full bathroom?
The familiar North American three-piece bathroom, with a tub or shower, a toilet and a vanity, is roughly five by eight feet (about 1.5 by 2.4 metres), and many Toronto houses have one. It works because the fixtures line up along one wet wall and the tub spans the room’s width. Rooms smaller than that can still hold three fixtures with a compact shower and a shallow vanity, but comfort drops quickly, and it becomes a matter of deciding which clearance to give up.
How much space do you need in front of and beside a toilet?
The NKBA recommends 30 inches (762 mm) of clear space in front of the toilet to the nearest fixture, wall or obstacle, and 18 inches (457 mm) from the toilet’s centreline to a side wall or neighbouring fixture. Its document cites tighter minimums from US model codes, 21 inches in front and 15 inches to the side, but those are the least that pass there rather than a comfortable target, and they are not Ontario’s rules. The plumber and inspector apply the Ontario requirements.
What size should a walk-in shower be?
The NKBA recommends an interior of at least 36 by 36 inches (914 by 914 mm). A tub-to-shower conversion in a standard 60-inch alcove gives more than that. A walk-in shower with an open side and a single fixed glass panel needs extra depth so water stays inside, and the head should spray away from the opening.
Can I move my toilet during a bathroom renovation?
Usually, but how easily depends on the distance, the direction of the floor joists and how far it ends up from the main stack. A few inches along the joists is often manageable. Crossing the joists or moving it across the room can involve the drain, the venting and the ceiling below, and usually needs a permit. In most condos the toilet drain is set in the concrete slab and is effectively fixed.
Do I need a permit to change my bathroom layout in Toronto?
Replacing fixtures in their existing positions typically does not need a building permit. Moving drains, altering the structure or adding a new bathroom usually does. The City of Toronto’s building division makes the final call, and other GTA municipalities decide through their own building departments. Electrical work is handled separately through the Electrical Safety Authority.
How far does an outlet have to be from a shower or tub in Ontario?
The Electrical Safety Authority’s current guidance on Rule 26-720 g) of the Ontario Electrical Safety Code says a bathroom receptacle is to be at least one metre from the bathtub or shower stall, measured horizontally. The code also requires a receptacle within one metre of the basin, and ground fault (GFCI) protection for receptacles near the basin, tub or shower. Because the rule is revised from time to time, your licensed electrician confirms the current requirement for your installation.
Should I keep a bathtub when I renovate?
It depends on the house and the household. Families with young children often want a tub, and it is worth thinking carefully before removing the only tub in a one-bathroom house. If there is another bathroom with a tub, converting the main tub to a larger walk-in shower is one of the most useful layout changes available in a standard Toronto bathroom.
What is the best layout for a small bathroom?
Usually the one that keeps the fixtures on one wet wall and protects the clear space in front of them. A shallow or wall-hung vanity, a wall-hung or short-projection toilet, a pocket or out-swinging door, a sliding or fixed-panel shower screen and recessed storage each give back inches. Moving plumbing rarely creates as much usable space as those choices together.
In short
Survey the real room, find the stack and the joist direction, and draw everything to finished surfaces. Protect the clear space in front of the fixtures before anything else, and use the NKBA figures as a comfortable target rather than a legal floor. Treat the toilet as fixed unless there is a good reason, and decide tub or shower, curb or curbless, and glass before rough-in, because each one is really a floor and wall decision.
Put outlets, lights, the fan and the heated floor on the plan at the same time as the plumbing, and follow the Ontario rules that genuinely apply: scald protection at the valve, safety glass, bathroom exhaust and outlet positions. Then tape the plan on the floor and walk through it.
Planning a bathroom in Toronto or the GTA? Our bathroom renovation page explains how the work is run, and a consultation lets us walk your room, measure what is really there and settle the layout and fixtures while every option is still open. For the bigger picture, see how to plan a home renovation in Toronto, how we run a project, and selected work.